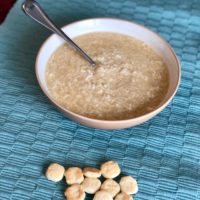
This simple recipe for Chicken Ramen Egg Drop Soup is perfect for cold weather and cold and flu season. Drink up and feel better!
It's a beautiful day in the neighborhood!
This simple recipe for Chicken Ramen Egg Drop Soup is perfect for cold weather and cold and flu season. Drink up and feel better!

I put my hand up on your hip, when I dip, you dip, we dip. That song is definitely an anthem from my adolescence and awkward pre-teen dancing, but now it just gives me the munchies. Because is there anything better in summer than sitting lakeside or poolside with an amazing DIP? I think not! […]

One of my favorite questions to ask friends is “What would your last meal on earth be?” I think you can tell a lot about a person from their choice, ya know? Mine would definitely be made by someone else because there is no way I’d be cooking if it was my last day 😉 […]
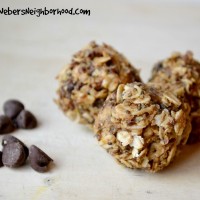
I don’t know about you all, but my kids have been awful about eating breakfast lately, so I’ve been experimenting with all kinds of new recipes. They pretty much have been refusing everything, with the exception of cereal. As a busy mom, I love the convenience of cereal, but it just doesn’t keep them full…Which means […]

I am a member of the siggi’s Culture Club and receive periodic coupons and insider information. I love this stuff, so believe me when I say that the opinions expressed are mine 😉 We have a food product obsession in our house: siggi’s Icelandic style skyr, which is found in the yogurt aisle at the grocery store. […]

There is one thing I miss most about my life before kids: Traveling. My bucket list is a mile long with places I would like to go. I was bit with the travel bug at a young age and have been lucky to travel to some really cool places {a few favorites include Hungary, Switzerland, England […]

This shop has been compensated by Collective Bias, Inc. and its advertiser. All opinions are mine alone. #PotPiePlease #CollectiveBias With the holiday season in full swing, there are sure to be a few parties on your list, right? I love having friends and family over for dinner, and have fun creating a menu, but I do […]

This post is part of an ongoing partnership with Absopure. All opinions expressed are my own. I’m so excited to share my new favorite drink because ’tis the season for entertaining, right?! In social situations, I’m typically a beer drinker, but I can see my love for craft beers hitting my waistline fast with the holidays […]

This shop has been compensated by Collective Bias, Inc. and its advertiser. All opinions are mine alone. #SnackAndGo #CollectiveBias My kids are obsessed with bugs and dirt…OBSESSED. At first I just thought it was my crazy girls, but I quickly realized every time they are playing with dirt in our yard, they draw a crowd […]

I have an ongoing partnership with Meijer and am compensated for posts. All opinions and content belong to me. I’ll admit it: I’m a bit Halloween obsessed. We have mums, LOTS of pumpkins and gourds, Halloween signs and even lights on our porch this year. I can’t help myself — my kids totally put me […]
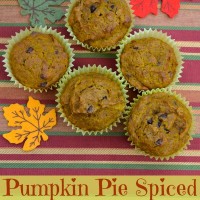
These delicious pumpkin pie spiced muffins taste like pumpkin pie on-the-go. Made with pure pumpkin, these sweet treats will dazzle your taste buds and help fill your belly on a cool fall day. Oh fall, you slay me with your burning bonfire scent, pumpkin-flavored-everything, leaves-crunching-on-the-ground ways. After a few sporadic days of chilly fall-like weather here […]

You know when you’re a kid and people ask what your favorite food is? Well, mine is pizza – hands down. Always has been, always will be. So when fellow Michigan blogger Being Cheap Easy did a shout for creative pizza ideas for #PizzaFriday, I knew I had to share my recent favorite. Recent studies show how […]
There is nothing quite like hot soup on a cold day. And since cold is synonymous with Michigan, we eat a heck of a lot of soup during the winter. I am totally digging this recipe, which I’ve tweaked to our liking over time. Since we’re amid the holidays, I love that it’s red, white and […]

I have been compensated by the United Dairy Industry of Michigan for my time to develop this recipe. All opinions expressed are my own. There is one thing we can always agree on meal-wise in our house: Pizza. But, when it comes to pizza, we can NEVER agree on toppings. My kids are picky. My husband is […]
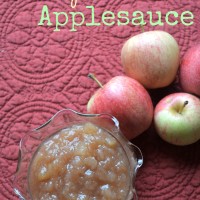
It’s apple season here in Michigan, and I couldn’t be happier. Move over everything pumpkin spice, this has been the year for all things apple! After a rough apple crop last year, I’m so happy to see apples a-plenty growing in abundance here and helping all of our wonderful orchards and cider mills stay in […]

The post below is sponsored by the United Dairy Industry of Michigan. I was compensated for developing a recipe using dairy products, however, all opinions expressed are my own. With three little ones, I’ll admit it: I don’t cook a full-blown breakfast as often as I’d like these days. Not that we go out, either. Between needy […]

I received promotional products in exchange for the post below. All opinions expressed are my own. The folks at Red Gold recently reached out to me to discuss a current promotion they were hosting, and I was beyond thrilled to hear that they are focused on growing in the Midwest {mainly Michigan, Indiana and Ohio}, […]

We all have our favorite holiday treats, right? Mine, by far, are these linzer thumbprint cookies! I love that they are made with old-fashioned ingredients and have a bit of spice to them, yet aren’t overly sugar-sweet like many cookies. My mom has been making these my entire life, so no Christmas in my mind […]

I’m incredibly picky when it comes to fish, so when I came across this recipe for spinach and pesto salmon in a puff pastry, I was curious to try it! It’s seriously amazing and is the perfect food for entertaining because it seems fancy, but it’s SO easy! {Trust me…I don’t post recipes that aren’t […]

Is there any better fall comfort food than pasta? Yeah, I think not. The #1 item my husband requests on the menu each week is pasta. We love trying new pasta dishes, so I was excited to try the new Kraft Recipe Makers for a quick family meal. As a busy work-from-home mama, the last thing […]